
Rockfish User Guide
Table of Contents
System Access
Logging into Rockfish
Log into Rockfish using Secure Shell (ssh) commands:
ssh -X userid@login.rockfish.jhu.edu
or
ssh -Y login.rockfish.jhu.edu -l userid
Multiplexing
To avoid having to authenticate (entering the verification code followed by your password) every time you open an ssh connection or use scp, you can sign in once and use the same connection for all your needs.
On your local Unix-based computer, enter the following text into the file (create it if necessary) ~/.ssh/config
					Host login.rockfish.jhu.edu
ControlMaster auto
ControlPath ~/.ssh/control:%h:%p:%r
Then, start the master connection in the background (adding -X if you use X11 forwarding):
ssh -fNM login.rockfish.jhu.edu -l userid
Now, every time you ssh or scp into login.rockfish.jhu.edu it should use the authenticated connection and not ask for any password. The only downside is that simultaneously transferring large files and trying to work on a terminal through the same connection may cause lag in your terminal. To open a new connection without going through the master, use the option -o ControlMaster=no. To close this background connection:
ssh -O stop login.rockfish.jhu.edu
Note that this will close all open connections. You can alternatively choose to run the master connection interactively by omitting the -fNM argument, in which case closing the master connection in the normal way will close all open connections.
To set up a multiplexed connection on Windows, use Plink with PuTTY
Requesting Allocations
Rockfish is accessible only to those users and research groups that have been given time and resources on the system. Hopkins PIs may request projects and allocations of resources at the Rockfish portal. After the allocation is approved and created users can request an account at the Rockfish portal and PIs or proxy should add user accounts to their allocations. This VIDEO shows the process to follow.
Once an account has been created users need to follow directions to configure their Two factor Authentication codes (using Google authenticator)
ssh [-XY] login.rockfish.jhu.edu -l userid
Managing Accounts
The Rockfish portal should be used by PIs and users to manage accounts and allocations. PIs can create projects, request allocations (which must be approved by the advanced computing committee), add or remove users to their allocations, upload publications, grants and other items for ROI.
Storage
LOCAL SCRATCH
Each compute node has a local 1+ TB NVMe hard drive mounted as “/tmp”. The latency to these NVMe flash drives is orders of magnitude lower than for spinning disk (GPFS), usually microseconds versus milliseconds. Users who read/write small files may want to use this space instead of the scratch file sets. It will provide better performance. Make sure you write files back to “scratch” or “data” before the job ends. Likewise, make sure you delete files and directories at the end of jobs.
/scratch4 & /scratch16
Rockfish has two file sets optimized for small files (4MB block size) and large files (16MB blocksize). Users are expected to use one or the other according to their workflows. If you need assistance in exploring which scratch filesystem is best for your workflow, reach out to us at help@rockfish.jhu.edu.
“scratch” is a high performance parallel file system that provides concurrent access to all compute nodes. Users are strongly encouraged to use “scratch” for any I/O processing while running jobs. “scratch” performance is about 36 gbps for writes and 46 gbps for reads.
Users can create aliases to easily access “scratch” filesets from any directory. For example, add to your .bashrc file:
alias cd16=”cd /scratch16/$(id -gn)” This alias will change directory to /scratch16/PI-userid
Be aware that “scratch” file systems are NOT backed up and data might be lost due to systems failures.
We strongly recommend that users move or have a second copy critical research files to the “data” file system
/data
This fileset has lower performance (about 36 gbps Read and Write) but larger capacity. Users are expected to store files for a longer time. ARCH strongly encourages users to use “scrach” for any intensive I/O. Reading files from “data” is fine but we may want to avoid too much I/O to this file system.
Data Transfer Nodes (DTN)
Rockfish has two data Transfer Nodes (DTNs) to be used by Globus to transfer data at high speeds. One set of DTNs is in the Science DMZ network and can connect Rockfish with any site that uses Globus. The name of the end point is “Rockfish Data”
DTNs should be used to move files to Rockfish using applications like Filezilla or the traditional secure copy command. For example:
scp file-name userid@rfdtn1.rockfish.jhu.edu:/scratch16/PI-id/user-id/file-name
Transferring files within globus
The recommended process to transfer large data files from and to the Rockfish cluster is to use Globus (globus.org). Globus manages all data transfers, in the background, and makes sure the process goes through even with interruptions.
1. Use a browser to connect to globus.org

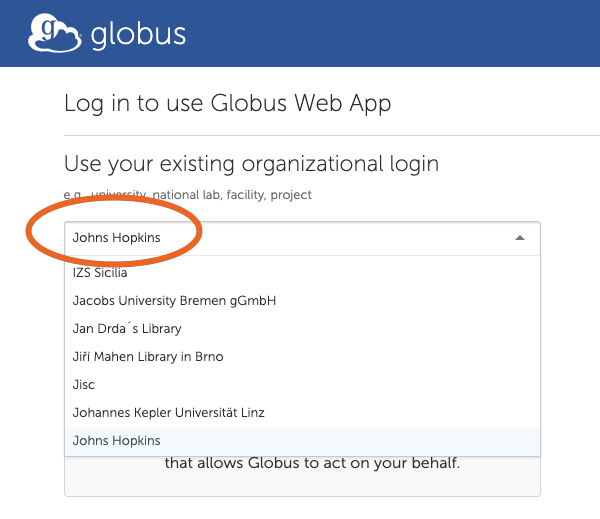
2. Search and Select “Johns Hopkins”
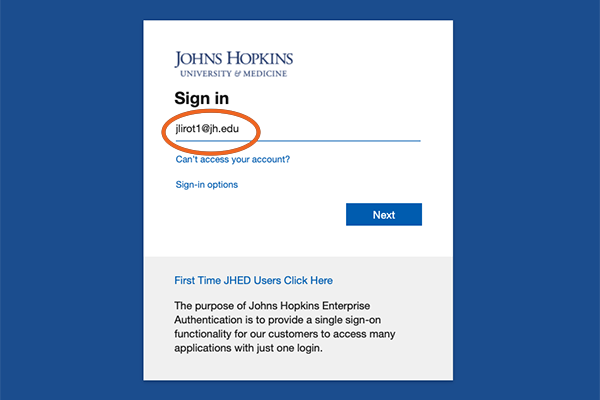
3. Log in using your JHED ID.
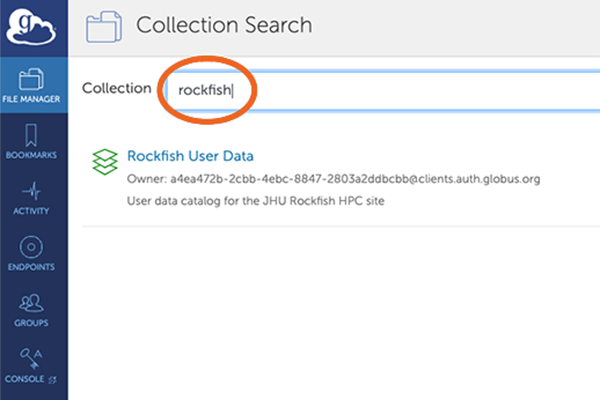
4. Collection Search
After your credentials are verified you will get Collection Search screen.
You need to search for the collection “rockfish”.
The Rockfish User Data collection will appear below – click on it.
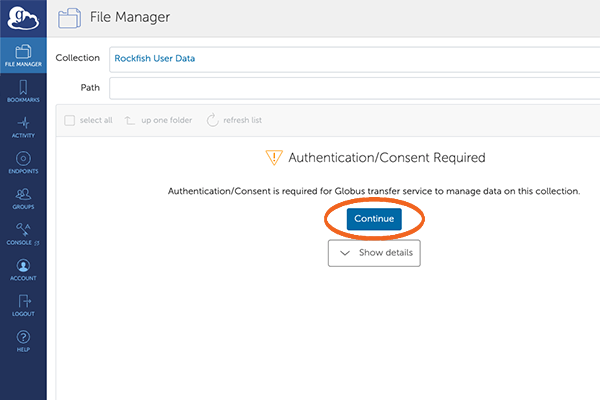
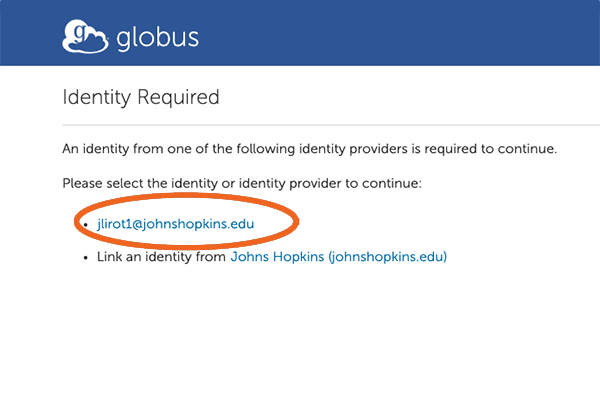
5. File Manager – Authentication
The following screen will give you the “Rockfish User Data” collection and a prompt to authenticate.
This needs to be done the fist time you access the collection, or if you delete it.
Click “Continue”.
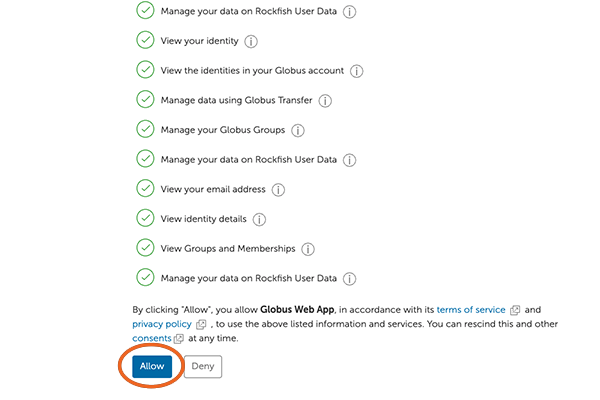
7. Allow Global Web App
Next, move to the bottom of the screen and click on “Allow”
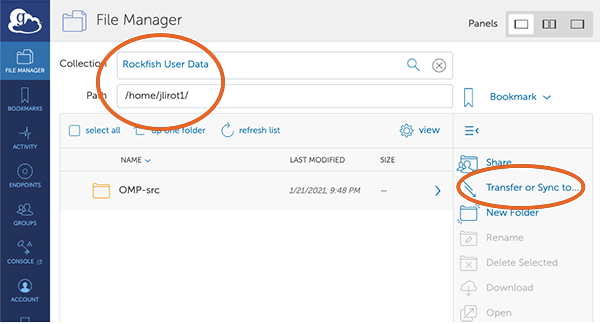
8. Select your end point.
This screen shows that you are connected to the Rockfish end point (your HOME directory).
You now need to select the second end point (where you are transfering data from/to).
In this case we will use the ARCH end point. Click on “Transfer or Sync (to the right)
9. Authenticate to the Rockfish cluster.
You need to select the end point “Rockfish” and authenticate to the Rockfish cluster. Click Continue”
10. MyProxy Client Authorization / Login
Use your Rockfish User ID and Rockfish password
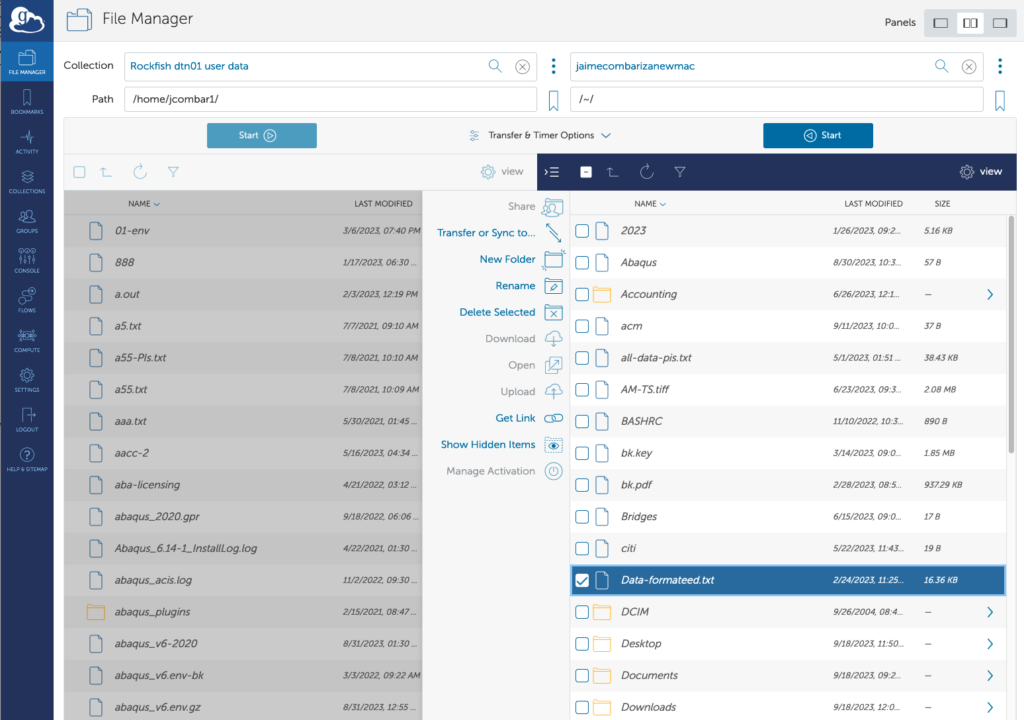
11. FileManager View
Now you will see a split window.
On the left side you can see files on Rockfish and on the right side files on the Rockfish (HOME dirs)
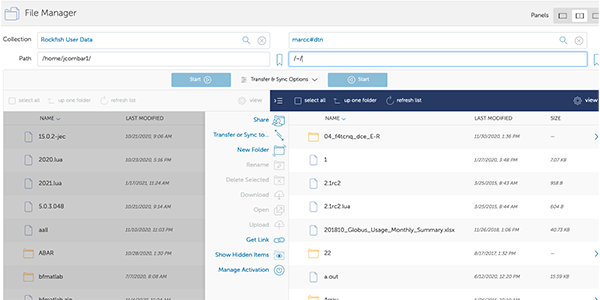
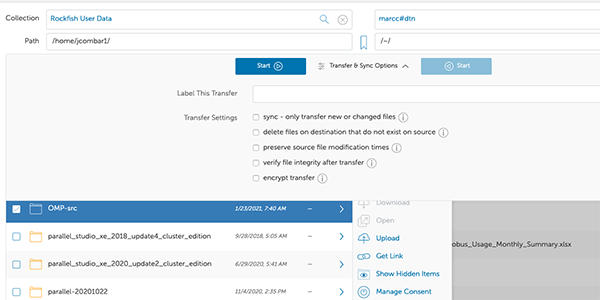
12. File Transfer
After you authenticate to Rockfish, you can start a file transfer.
For example: I want to copy the directory “OMP-src”, select it and then click on “start”. You may want to check the “Transfer & Sync Options”.
SLURM & Running jobs
Slurm
Rockfish uses the Simple Linux Utility for Resource Management (SLURM) batch environment. When you run in batch mode, you submit jobs to be run on the compute nodes using the “sbatch” command as described below. Remember that production or debugging jobs should be run only on the compute nodes and not the login nodes.
Accounting
Rockfish allocations are awarded in core-hours (or wall-time hours). The recommended method for estimating your resource needs for an allocation request is to perform benchmark runs. The core-hours used for a job are calculated by multiplying the number of processor cores used by the wall-clock duration in hours. Rockfish core-hour calculations should assume that all jobs will run in the regular queue.
For example: if you request one core on one node for an hour your allocation will be charged one core-hour. If you request 24 cores on one node, and the job runs for one hour, your account will be charged 24 core-hours. For parallel jobs, compute nodes are dedicated to the job. If you request 2 compute nodes and the job runs for one hour, your allocation will be charged 96 core-hours.
Job accounting is independent of the number of processes you run on compute nodes. You can request 2 cores for your job for one hour. If you run only one process, your allocation will be charged for 2 core-hours.
Charge = Number of cores x wall-time.
Partitions
“express queue”: This partition is designed to run quick jobs like tests, debugging, or interactive computing (Jupyter notebooks, R-Studio, etc). The limits are up to 4 cores, 8 hours, up to 8GB of memory per job. It is shared meaning many jobs are allowed to run on the same node.
“shared queue”: This partition is designed to run a mix of jobs, from sequential jobs needing just one core to small parallel jobs (32 cores or less). Nodes on this queue may share resources with many other jobs. The memory per core is set by default to 4 GB. If the application needs more than 4GB memory per process users can request 2 cores and this will give 8GB of memory to the job. Each core will add 4 GB or memory
“parallel queue”; This partition is designed to run ONLY parallel jobs that require 48 cores or more. Jobs can run on a single node or multiple nodes. Nodes in the “parallel” queue are dedicated to the job. These are not shared with any other jobs. Users should make sure all cores will be used. The timelimit is 72 hours. A research group can run jobs up to 3600 cores or 75 nodes.
“a100 queue”: This partition/queue is designed to run jobs that require the use of GPU nodes. Each node has 4 Nvidia A100 gpus with 40GB of memory per gpu. This allocation is defined by the account “PI-userid_gpu“. This account should be included in the SLURM script as
“#SBATCH -A PI-userid_gpu”
“bigmem queue”: This queue contains nodes with 1500GB of memory and it is designed to run jobs that require more than 192GB of memory. Use of this queue requires a separate allocation of the type “PI-userid_bigmem“. This account should be included in the SLURM script as
“#SBATCH -A PI-userid_bigmem”
“ica100 queue”. This partition is similar to the “a100” queue but each GPU has 80GB of memory.
Submitting a job
Submitting jobs using “sbatch”
Ideally users write a script that contains SLURM flags to set the environment, load modules and run commands to execute codes.
For example:
| #!/bin/bash -l | Recommended Linux shell |
#SBATCH –job-name=”MyJob” | name of the Job |
#SBATCH –output=”myLog-file” | IOf you want to explicitly direct the output to a file. The default is slurm-jobid.out |
#SBATCH –partition=parallel | Name of the queue |
#SBATCH —t 00-01:30:15 | Time limit (0 days, 1 hour, 30 minutes and 15 seconds) |
#SBATCH –nodes=2 (or -N 2) | Number of nodes requested |
#SBATCH –ntasks-per-node=48 | Number of cores per node. 48 in this case as the parallel queue is exclusive |
###SBATCH –mem=” “ | We strongly recommend not to use the flag “mem” unless absolutely necessary. The memory per core is set to 3.9GB and the total memory per job is given by the number of cores/tasks requested |
#SBATCH –account=XYAWA | Make sure the proper account is used. By default Slurm will use the primary account for tthe user |
#SBATCH –export=ALL |
#This script will run a job with 2 nodes, 48 cores per node in the parallel queue
#load modules
ml purge
ml intel intel-mpi
mpirun -np 96 ./my-mpi-code.x < my-input-file
Example Scripts
Basic openMP Job Script
Hybrid MPI-OpenMP Job Script
					#!/bin/bash -l
#SBATCH --job-name=”MyLMJob”
#SBATCH --output=”myLog-file”
#SBATCH --partition=parallel
#SBATCH ---t 02-01:30:15
#SBATCH --nodes=1
#SBATCH --ntasks-per-node=8
#SBATCH --account=XYAWA
#SBATCH --cpus-per-task=6
#SBATCH --export=ALL
ml gcc openmpi
module load hwloc
module load boost
module load gromacs/2016-mpi-plumed
module load plumed/2.3b
export CUDA_AUTO_BOOST=1
mpirun -np 8 bin/gmx_mpi mdrun -deffnm options
					#!/bin/bash -l
#SBATCH –job-name=”OpenMP-Job”
#SBATCH –output=”myLog-file”
#SBATCH –partition=shared
#SBATCH —t 00-01:30:15
#SBATCH –nodes=1
#SBATCH –ntasks-per-node=8
###SBATCH –mem-per-cpu=4GB
#SBATCH –account=XYAWA
#SBATCH –export=ALL
ml purge
ml intel intel-mpi intel-mkl
export PMP_NUM_THREADS=8
time ./a.out > MyOutput.log
Big Mem Job Script
					#!/bin/bash -l
#SBATCH --job-name=”MyLMJob”
#SBATCH --output=”myLog-file”
#SBATCH --partition=bigmem
#SBATCH -A PI-userid_bigmem
#SBATCH ---t 02-01:30:15
#SBATCH --nodes=1
#SBATCH --ntasks-per-node=8
#SBATCH --export=ALL
ml purge ml intel
a.out > MyLog.out
GPU Job Script
This script is an example to run a NAMD job that uses 44 cores and 4 GPUS.
					 #!/bin/bash -l
 #SBATCH –job-name=namd4gpu
 #SBATCH –time=48:0:0
 #SBATCH –partition=a100
 #SBATCH –nodes=1
 #SBATCH –ntasks-per-node=48
 ####SBATCH –mem-per-cpu=4G
 #SBATCH –gres=gpu:4
 #SBATCH -A “Slurm-account”_gpu ### Slurm-account is usually the PI’s userid
 #load modules and check
 ml purge
 module load namd/2.14-cuda-smp
 ml
 export CUDA_VISIBLE_DEVICES=0,1,2,3
 export CONV_RSH=ssh
 GPUS_PER_NODE=4
 NODELIST=$SLURM_JOBID.nodes
 JOBNODES=$(scontrol show hostname $SLURM_JOB_NODELIST)
 echo group main > $NODELIST
 for nodes in $JOBNODES ; do
 echo host $nodes >> $NODELIST
 done
 PPN=$(( $SLURM_NTASKS_PER_NODE / $GPUS_PER_NODE – 1 ))
 P=$(( ( $SLURM_NTASKS_PER_NODE – $GPUS_PER_NODE ) * $SLURM_JOB_NUM_NODES ))
 COMMAND=”`which namd2` +ignoresharing +idlepoll +p 44 +setcpuaffinity +pemap 1-11,13-23,25-35,37-47 +commap 0,12,24,36 +devices 0,1,2,3″
 echo $COMMAND
 $COMMAND step1_NPT.conf > npt/npt.log
 $COMMAND step2_NVT.conf > nvt/nvt.log
 $COMMAND step3_Production.conf > production/production.log
Job Arrays
This script is an example to run a set of 5,000 jobs. Only 480 jobs will run at a time. The input files are located in a directory ($workdir). A temporary directory ($tmpdir) will be created in “scratch” where all the jobs will be run. At the end of each run the temporary directory is deleted.
					#!/bin/bash -l
#SBATCH –job-name=small-array
#SBATCH –time=48:0:0
#SBATCH –partition=shared
#SBATCH –nodes=1
#SBATCH –ntasks-per-node=1
###SBATCH –mem-per-cpu=4G
#SBATCH –array=1-1000%480
#load modules and check
ml purge
module load intel
ml
# set variable “file” to read all the files in $wordir (zmatabcde where “abcde” goes from 00001 to 05000) and assign them to the job array
file=$(ls zmat* | sed -n ${SLURM_ARRAY_TASK_ID}p)
echo $file
Get the number for each file (abcde)
newstring=”${file:4}”
export basisdir=/scratch16/jcombar1/LC-tests
export workdir=/scratch16/jcombar1/LC-tests
export tmpdir=/scratch16/jcombar1/TMP/$SLURM_JOBID
export PATH=/scratch16/jcombar1/LC/bin:$PATH
export OMP_NUM_THREADS=1
export MKL_NUM_THREADS=1
mkdir -p $tmpdir
cd $tmpdir
# run your job
cp $workdir/$file ZMAT
cp $basisdir/GENBAS GENBAS
./a.out > $workdir/out.$newstring
cd ..
\rm -rf $tmpdir
Jupyter Notebook Job Script
					#!/bin/bash
#SBATCH –ntasks-per-node 1
####SBATCH –mem-per-cpu 4G
#SBATCH –time 1:00:00
#SBATCH –job-name jupyter-notebook
#SBATCH –output jupyter-notebook-%J.log
ml anaconda
## or use your own python/conda enviromnent
XDG_RUNTIME_DIR=””
port=$(shuf -i8000-9999 -n1)
echo $port
node=$(hostname -s)
user=$(whoami)
jupyter-notebook –no-browser –port=${port} –ip=${node}
NOTE: look at the file “jupyter-notebook-JOBID.log” for information on
# new ssh command from a different windows in your local machine (ssh -N -L ${port}:${node}:${port} ${user}@login.rockfish.jhu.edu)
# the line to copy and paste in your browser (http://127.0.0.:PORT-number/?token ………..)
R-Studio Server
The open-source RStudio server provides a fully-featured IDE for R users.
The ARCH users can access the RStudio Server on Rockfish using the r-studio-server.sh command. It will create a Slurm script to run on the system.
Usage examples to start the RStudio service:
					$ r-studio-server.sh -h
$ r-studio-server.sh -n 1 -c 2 -m 8G -t 1-02:0 -p parallel (default)
$ r-studio-server.sh -c 2 -t 4:0:0 -p parallel -e @jhu.edu
$ r-studio-server.sh -c 24 -g 2 -p a100 -a _gpu
Executing the
$ r-studio-server.sh
Copying R-Studio-Server singularity image: rstudio_1.4.1106.sif
$ cat rstudio-server.job.3248065.out
1. SSH tunnel from your workstation using the following command:
ssh -N -L 44539:c124:44539 $USER@login.rockfish.jhu.edu
2. log in to RStudio Server in your web browser using the Rockfish cluster credentials (username and password) at:
http://localhost:44539
user: $USER
password: < ARCH password >
3. When done using RStudio Server, terminate the job by:
a. Exit the RStudio Session (“power” button in the top right corner of the RStudio window)
b. Issue the following command on the login node:
scancel -f 3248065
————————————————
The command reserves 1 processor for 2 hours (default) on the parallel partition.
You will see an output file written by SLURM called e.g. rstudio-server.job.3248065.out, after the job started in your current directory, the number corresponds to your SLURM log file for this job.
The file contains instructions how to login to RStudio Server. You will also see a folder called $USER/singularity/r-studio/ which contains the R-Studio-server singularity image.
Run this command (How to login 1) in a dedicated terminal (In your local machine). The specific compute node and port numbers will be unique to your session (How to login 2) in your web browser, it will ask to you the the Rockfish cluster credentials.
After you run it, you can check the status of the resulting SLURM job by running the sqme command. When you are finished it you SHOULD cancel the job by using the scancel -f 3248065 command (How to login 3), where the number corresponds to your SLURM job ID.
Note: If you do not cancel it, the job will be finished only when the time wall is reached.
Jupyter lab
The JupyterLab is the latest web-based interactive development environment for notebooks, code, and data. Its flexible interface allows users to configure and arrange workflows in data science, scientific computing, computational journalism, and machine learning.
The users can access the JupyterLab on Rockfish using the jupyterlab.sh command. It will create a SLURM script.
Usage examples to start the JupyterLab service
					$ jupyterlab.sh -h
$ jupyterlab.sh -n 1 -c 2 -m 4 -t 0-02:0:0 -p parallel (default)
$ jupyterlab.sh -c 2 -t 4:0:0 -p parallel -e @jhu.edu
—————————– Example —————————–
$ jupyterlab.sh
The jupyterlab.sh script will create a slurm script for multiple environments with jupyterlab and #SBATCH with default parameters.
Use jupyterlab.sh –help for more details.
1. Slurm script to run jupyterlab (jupyter_lab.slurm.script)
2. File with login information (Jupyter_lab.job..login)
3. File related to slurm INPUT ENVIRONMENT VARIABLES and HTTPS server information (Jupyter_lab.info)
4. Notebook server file (.jupyter/jupyter_notebook_config.py)
5. The jupyter-lab, ipykernal, pip will be installed/updated in: /home/$USER/jp_lab
<Ctrl+C> to cancel
Sign in with your Rockfish Login credentials:
Enter the $USER password:
Creating slurm script: /home/$USER/jupyter_lab.slurm.script
SLURM job script for run Jupyter Lab
The Jupyter Lab is ready to run.
- Usage:
- $ sbatch jupyter_lab.slurm.script
- How to login see login file (after step 1)
- $ cat Jupyter_lab.job..login
- Further information
- $ cat Jupyter_lab.info
Instructions for adding multiple envs:
First, change to the proper version of Python or Conda
- For Python Virtual environment
- $ module load python; source /bin/activate
- For Conda environment
- $ module load conda; conda activate
then:
- (myenv)$ pip install ipykernel
- # Install Jupyter kernel
- (myenv)$ ipython kernel install –user –name= –display-name “Python (myenv)”
- # List kernels
- (myenv)$ jupyter kernelspec list
Interact Session
Users can request interactive sessions to compute nodes via the “interact” command (based on srun).
interact -n 1 -c 1 -p queue-name -t “time in minutes”
Open On Demand
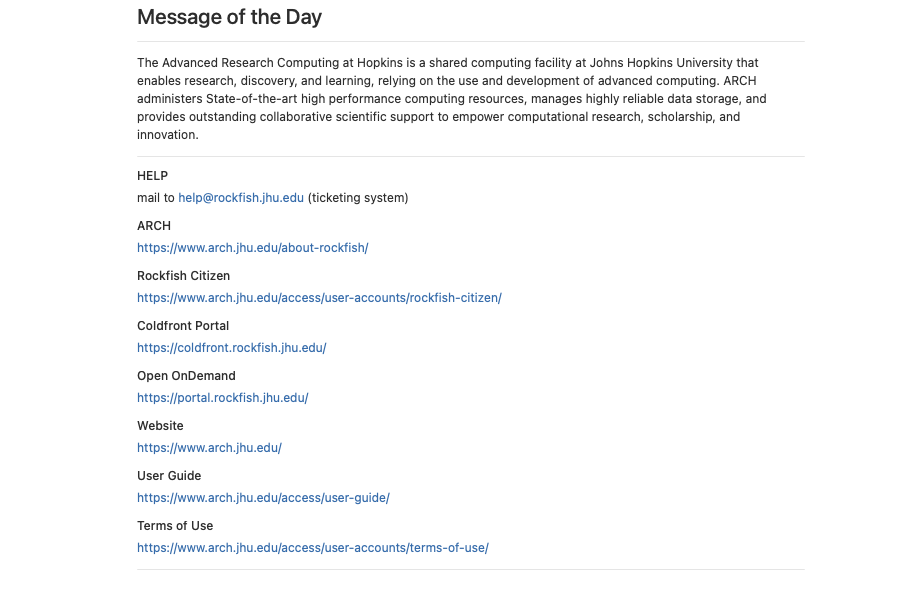
Help
e-mail to help@rockfish.jhu.edu (ticketing system)
Open OnDemand (OOD) is an NSF-funded open-source HPC portal. It is a way for all our users to access the Rockfish cluster HPC resources via a web interface. It is a web-portal that provides a shell, file browser, and graphical interface for applications such as IGV, Matlab, ParaView, Jupyter and RStudio Server, etc.
A Rockfish account is necessary to use OOD. Also, a campus network connection or VPN is required to access the OOD portal.
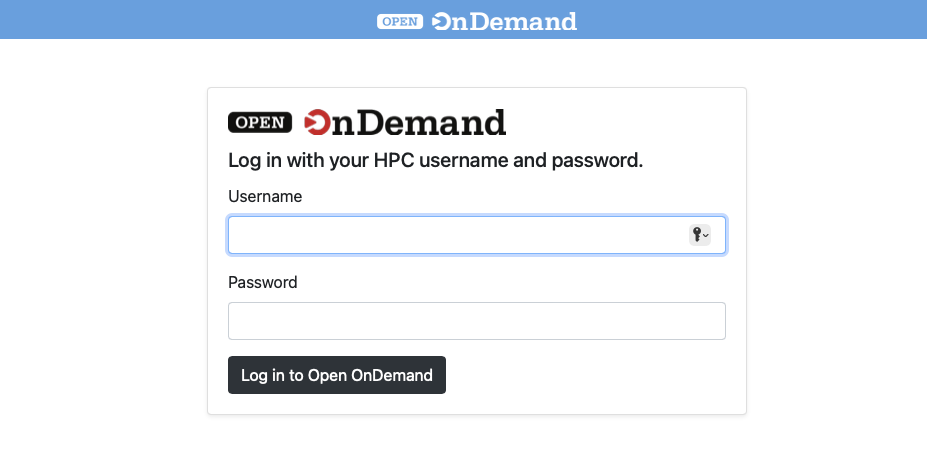
Once authenticated, you will be on the main page.

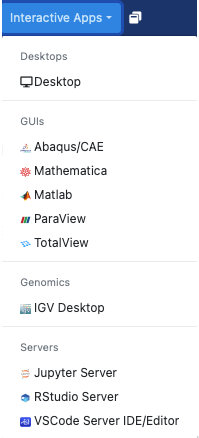
Along the top are a pull-down menus for an Apps, Files App, Jobs, shell, and a list of Interactive Apps.
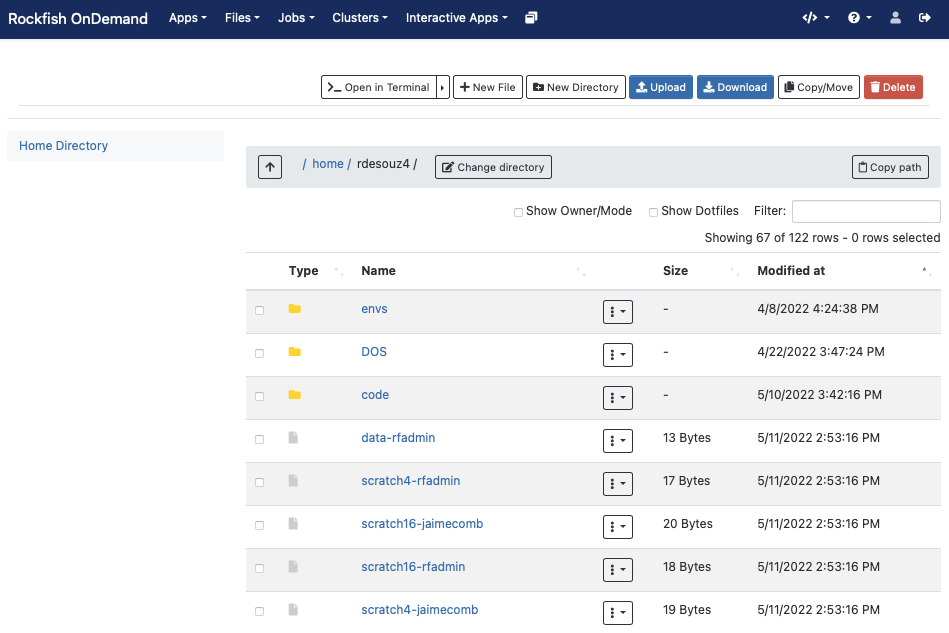
The file browser application provides a web-based file explorer that allows the user to remotely interact with the files on the Rockfish cluster’s local file system. You can drag and drop files, download entire directories, and also move files between directories all from within the web browser.
Interactive apps (Plugins)
Interactive Apps provide a means for a user to launch and connect to an interactive batch job running a local web server (called Interactive App sessions) through the OnDemand portal (e.g., Abaqus/CAE, RStudio, Jupyter Lab and Notebook, MATLAB, Linux remote desktops) on Rockfish cluster. They are considered Dashboard App Plugins and not Passenger apps such as the Dashboard App, Shell App, Files App, and etc.
Remote desktop
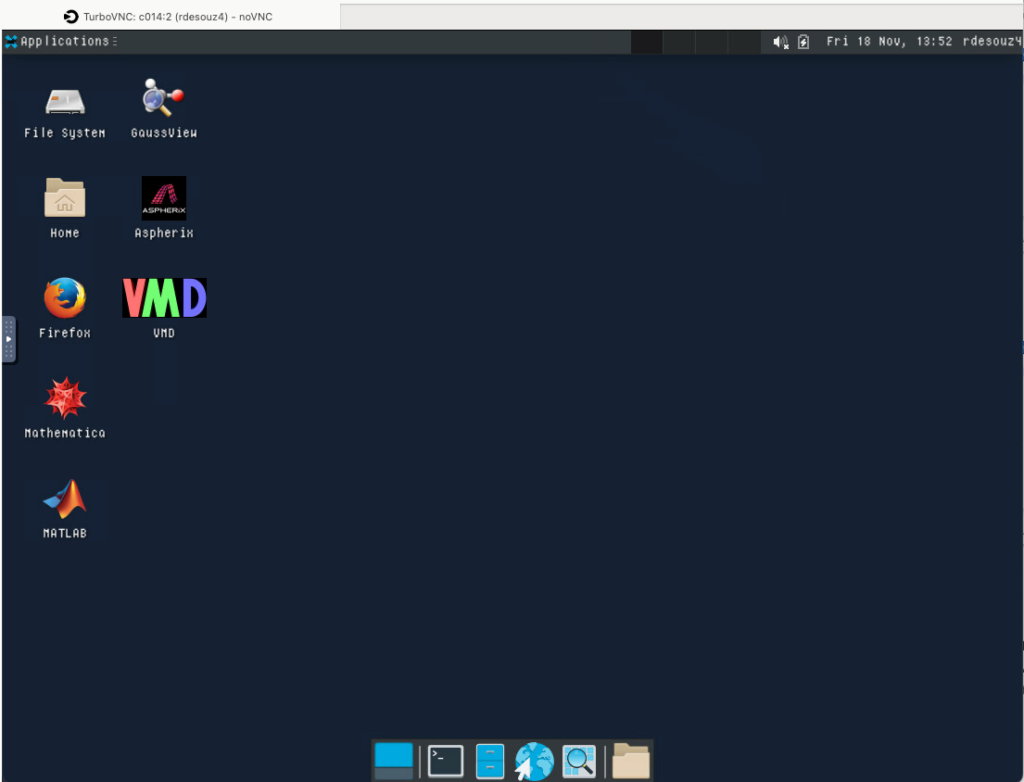
Once in awhile, it is helpful to use a graphical interface to access data or certain programs. In this case, users have typically utilized VNC or X11 forwarding. Both of these tools have complications, either in complexity of setup or in performance. The Remote Desktop option from OOD simplifies the configuration of a VNC desktop session in a compute node.
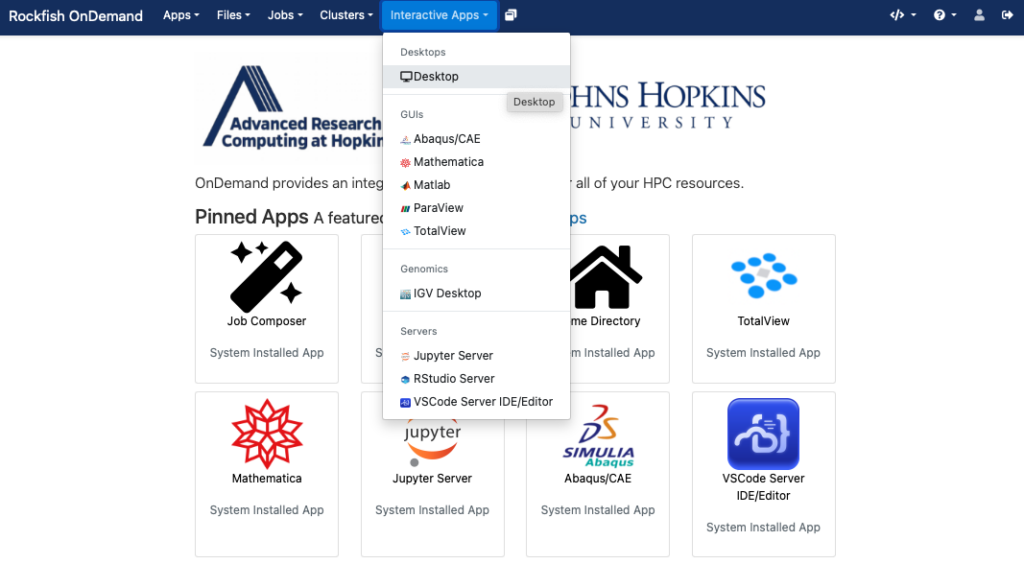
First request the desktop application, i.e. anything under Desktops or GUIs, which you would like to use. Here we choose the Desktop.
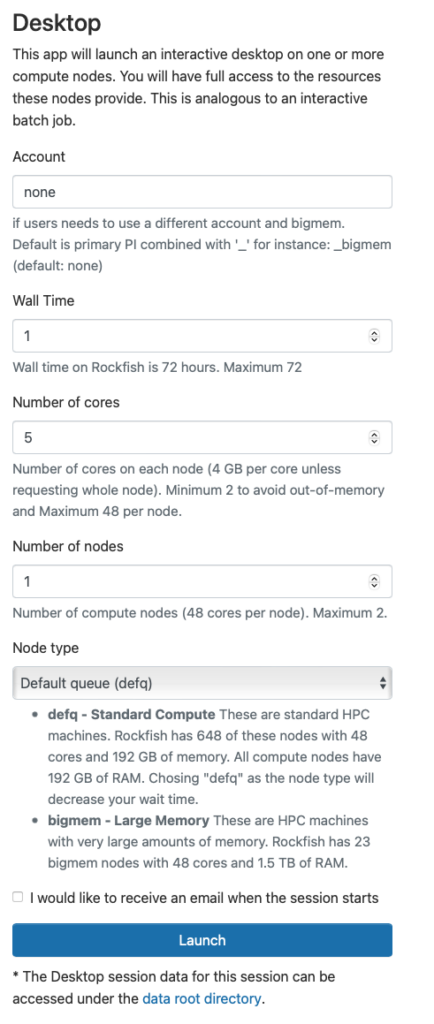
You will next see a form to specify the resources you’d like for the job. Specifically the duration of the job (wall time), the number of cpus (cores), node type, etc. Below we ask for five hours and 2 cores. We also optionally specify a standard compute parallel with 4 Gb memory each cpu. If you wish you can also receive an email notification for when the job starts. Once you have filled out the form click Launch.
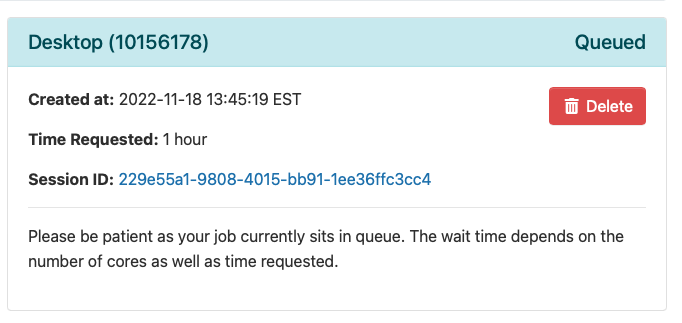
Once you launch the job, you will be presented with a notification that your job has been queued. Depending on the resources requested, your job should be scheduled within minutes. Then you will see the option to launch your session. Choose your display settings and click the launch button for your particular application, in this case Launch Remote Desktop.
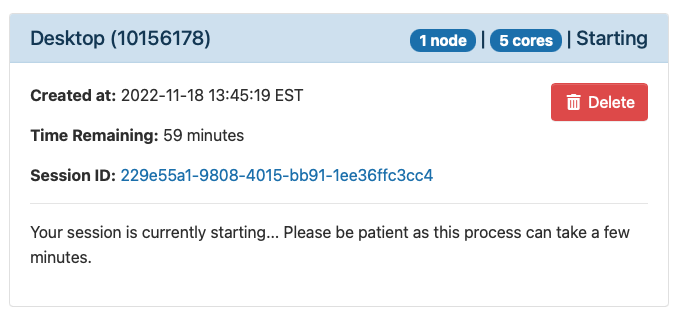
Once Slurm Scheduler is ready to use the requested resource, click Launch.
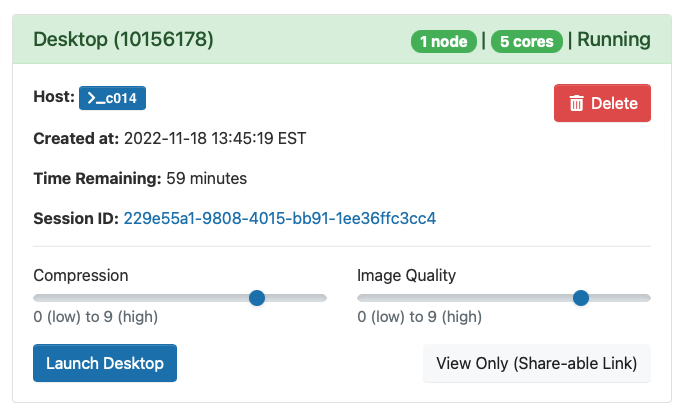
So, if you have any problems starting this an app, look at Session ID: this case: (229e55a1-9808-4015-bb91-1ee36ffc3cc4), then open output.log file for more details.
Modules
About Modules
The Rockfish cluster uses Modules (lua modules version 8.3, developed at TACC) to dynamically manage users’ shell environments. “module” commands will set, modify, or delete environment variables in support of a scientific application. Modules allow users to select a particular version of an application or a combination of packages.
For example, if the Intel and intel-mpi modules are loaded and the user compiles with “mpif90”, the executable generated is compiled with the Intel compilers and links intel-mpi libraries.
Several modules are loaded by default at login time. These include Slurm, gcc/9.3 and openmpi/3.1 We strongly recommend that users utilize these combination of modules whenever possible to get the best performance.
Useful Module Commands
Command | alias/function | Description |
module list | ml | List scientific packages that are currently loaded |
module avail | ml av | List all scientific packages that are available |
module show | ml show | Show the environment variables and in some cases compilation options |
module load | ml | Load the named |
module unload | ml – | Unload the named |
module spider | ml spider | Show if the is available and different versions. It will show if there are any requirements |
module save | ml save (module-env> | Save current modules into a session (default) or named session. |
module swap | ml | It automatically swaps versions or modules |
Loading and Unloading Modules
To avoid conflicts users may need to remove some modules before they can load other modules.
At Rockfish and with Lua modules, this is done automatically for most cases. For example, if you load intel and intel-mpi modules and later your load gcc, users will get a message:
“Lmod is automatically replacing intel/202.1 with gcc/9.3.0”.
In addition, users will get a message (screen) “Inactive Modules: intel-mpi”.
If users need to load a set of modules on a regular basis, this process can be automated in two ways:
- Add the module load into the .bashrc file
- Load all necessary modules and save them. For example, “ml matlab intel intel-mpi” will load these three modules. Then type: “module save” to save them into the default module session. These modules will be loaded each time you connect. Alternatively, users can save the loaded modules and give the environment a new name. It can be “restored” later.
“module save My-env”;and load then as “module restore My_env”
Compiling
About Compiling
The Rockfish cluster will have three different compilers for compute nodes, GNU, Intel and PGI. There are also MPI libraries (openmpi, Intelmpi and Mvapich2). The majority of applications have been built using GNU compilers version 9.3.0. Users should evaluate which compiler gives the best performance for the applications.
Using Intel Compliers
The intel compilers and intel-mpi libraries can be loaded by executing the following command:
ml intel intel-mpi intel-mkl
a standard command to compile a Fortran or C-code will be:
ifort (icc) -O3 -xHOST -o code.x code.f90 (or code.c)
[add as many flags as needed]
Using GNU Compilers
g++ -O3 -march=native -mtune=native -march=cascadelake-avx2
Containers
Singularity
Singularity (version 3.7.4-1) is available on compute nodes. No need to use a module. To request an interactive session on compute nodes use: interact -p parallel -n 1 -c 1 -t 120
For additional information consult this site More on Singularity